
WebPageTest Scripting — Recipes for Single Page Applications
WebPageTest is an online tool and an Open Source project to help developers audit the performance of their websites.
As a Web Performance Evangelist at Theodo, I use it every. single. day. I am constantly amazed at what it offers, for free, to the Web Development community at large and the Web Performance folks particularly.
I mean, look at how adamant Brad Frost is about it:
https://twitter.com/brad_frost/status/1107714993703788544
WebPageTest is really straightforward to configure and run for “static”, public-facing webpages: just enter the URL, pick your audit environment and you’re good to go.
However, things can get hairy pretty quickly when dealing with Single Page Applications (usually written with React, Vue, Svelte or any other frontend framework). How can you get through a login page? How can you test the performance of your users’ flow, when most of it happens client-side and does not have a specific URL to point to?
Throughout this article we are going to find out how to solve these problems, and many more, and you’ll be ready to test the performance of your Single Page Application with WebPageTest!
Note: This articles requires an intermediate understanding about some of WebPageTest advanced features.
If you are curious about Web Performance and want a good introduction to WebPageTest, I would highly recommend the following resources:
- How To Use WebPageTest and its API on CSS Tricks, a nice overview of WebPageTest features by Edouardo Bouças;
- Who has the fastest website in F1? by Jake Archibald, which explains how analyzing WebPageTest results can lead you to performance improvements on a Formula 1-themed case study.
Contents
- Why is there a problem with testing Single Page Applications with WebPageTest?
- The many ways of selecting an element
- Recipes for common use-cases
- What about IE 11 compatibility?
- General tips and tricks for WebPageTest scripting
Why is there a problem with testing Single Page Applications with WebPageTest?
Single Page Applications radically changed the way websites work: instead of letting the backend (be it Django, Rails, Laravel…) do most of the grunt work and delivering “ready-to-use” HTML to the browser, SPAs rely heavily on JavaScript (and frontend frameworks) to have the browser compute the resulting HTML from JavaScript code.
The simplicity of WebPageTest is what makes part of its appeal to developers: head to http://webpagetest.org/easy, enter your URL, wait a little and voilà! Your performance audit is ready.
If you are building an SPA and want to measure its performance, you could rely on end-to-end testing tools like Selenium, Cypress or Puppeteer. However, I have found that none of them offer the amount of performance-related information and easy-to-use tooling that WebPageTest offers.
But testing SPAs with WebPageTest can be tricky.
In many SPAs, most of the application is protected behind a login form. I use Netlify a lot for hosting my websites and blog, and most of the time I spend in the application is on authenticated pages, like the dashboard listing all my websites. As the information on my dashboard is specific to me, any other user trying to access https://app.netlify.com/teams/phacks/sites is not going to see my dashboard, but will instead be redirected to a login page (or a 404 one).
The same goes for WebPageTest: if I enter my dashboard URL into http://webpagetest.org/easy, the audit will actually be performed against the login page.
In addition, testing and monitoring the performance of dynamic interactions in SPAs cannot be achieved with simple WebPageTest audits. Nuage is a domain name registrar with fancy animations and a beautiful, dynamic interface. When you search for domain names to buy, an asynchronous call fetches the results of the request and the results are displayed as they are retrieved.
As you might have noticed in the video above, the URL of the page does not change when I typed my search terms. As a consequence, it is not possible to test the performance of the search experience using a simple WebPageTest audit as we do not have a proper URL to point to the action of searching something, only to an empty search page.
Some other problems can arise from that paradigm shift when using WebPageTest:
- Clicking around to navigate a webpage is usually harder than merely heading to a new URL, but it is sometimes the only option in SPAs;
- Authentication in SPAs is usually implemented using JWTs instead of the good ol’ cookies, which rules out the option of setting authentication cookies (as described here);
- Using React and Redux (or other application state management libraries) for your SPA can mean that forms are harder to fill out programmatically, as using
innerTextorvalueto set a field’s value may not be forwarded to the application store; - As API calls are often asynchronous and various loaders can be used to indicate a loading state, those can “trick” WebPageTest into believing the page is actually finished loading when it has, in fact, not. I have seen it happen with longer-than-usual API calls (5+ seconds).
As I have faced this problems on several projects, I have come up with a range of tips and techniques to counter them, which we will hopefully address in the rest of this post.
The many ways of selecting an element
Selecting DOM elements is a key part of doing all sorts of automated testing, be it for end-to-end testing with Selenium or Cypress or for performance testing with WebPageTest. Selecting DOM elements allows us to click on links and buttons, fill in forms and more generally interact with the application.
There are several ways of selecting a particular DOM elements using native browser APIs, that ranges from the really easy to use document.getElementsByClassName to the hairy but really powerful XPath selectors. In this section, we will see three different possibilities, ordered by growing complexity.
Get an element by id, className or tagName
If the element you want to select (say, an “Empty Cart” button) has a specific and unique id (e.g. #empty-cart), or class name, or is the only button on the page, then clicking on it straightforward:
const emptyCartButton = document.getElementsById("empty-cart")[0];
// or document.getElementsByClassName(".empty-cart-button")[0]
// of document.getElementsByTagName("button")[0]
emptyCartButton.click();
If you have several buttons on the same page, you can filter the resulting list before interacting with the element:
const buttons = document.getElementsByTagName("button");
const emptyCartButton = buttons.filter(button =>
  button.innerText.includes("Empty Cart")
)[0];
emptyCartButton.click();
Use complex CSS selectors
Sometimes, the particular element you want to interact with does not present an interesting unicity property in either its id, class or tag.
One way to circumvent this issue is to add this unicity manually, for testing purposes only. Adding #perf-test-empty-cart-button to the specific button is quite innocuous for your website markup and can dramatically simplify your testing setup.
However, this solution can be out of reach sometimes: you may not have access to the source code of the application, or not be able to deploy quickly. In those situations, it can be useful to know about document.querySelector (and its cousin document.querySelectorAll) and using complex CSS selectors.
Here are a few examples of what can be achieved with document.querySelector:
// Select the first input with the `name="username"` property
document.querySelector("input[name='username']");
// Select all number inputs
document.querySelectorAll("input[type='number']");

// Select the first h1 inside the <section>
document.querySelector("section h1");

// Select the first direct descendent of a <nav> which is of type <img>
document.querySelector("nav > img");
What’s interesting here is you have at hand the full power of CSS selectors. I encourage you to have a look at the always-useful MDN’s reference table of selectors!
Going nuclear: XPath selectors
XPath (XML Path Language), albeit really powerful, is harder to grasp and maintain than the CSS solution I presented above. In my experience, I rarely have to resort to it, but it is definitively useful to know that it exists.
One such instance is when you want to select a node by its text value, and can’t resort to CSS selectors. Here’s a handy snippet that use in those cases:
// Returns the <span> that has the exact content 'Sep 16, 2015'
document.evaluate(
  "//span[text()='Sep 16, 2015']",
  document,
  null,
  XPathResult.FIRST_ORDERED_NODE_TYPE,
  null
).singleNodeValue;
I will not go into details on how to use it as it would have me wander far away from the goal of this article. To be fair, I don’t even know what many of the parameters above even mean. However, I can definitely recommend the MDN documentation should you want to read a bit on the topic.
Recipes for common use-cases
In order to illustrate those recipes, I will use the React Admin demo website as an example. React Admin is an open source project aimed at building admin application.
I think it is a typical example of a Single Page Application because it uses React (as the name suggest), calls remote APIs, has a login interface, many forms and client-side routing. I encourage you to go take a quick look at the website (the demo account is demo/demo ) in order to have an idea of what we will be trying to achieve.
Authentication and Forms
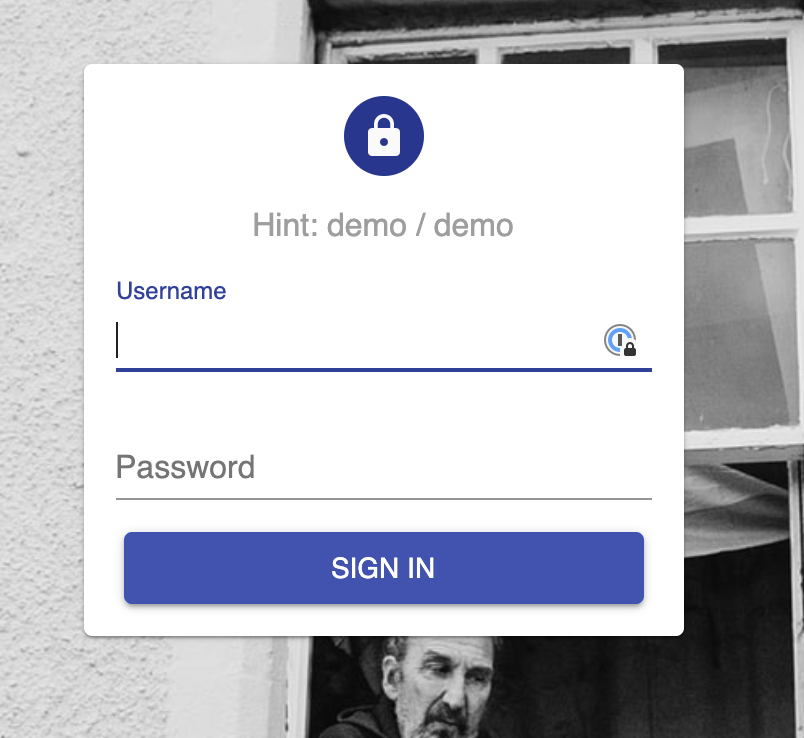
The authentication page of React Admin requires the user to input a username and a password:
Intuitively, one could take the following approach to filling in the form and submit:
const [usernameInput, passwordInput] = document.getElementsByTagName("input");
usernameInput.value = "demo"; //innerText could also be used here
passwordInput.value = "demo";
document.getElementsByTagName("button")[0].click();
If you run this commands sequentially in a DevTools console on the login page, you will see that upon submitting by clicking the button, all fields are resetted and the login request will fail.
As mentioned in “Why is there a problem with testing Single Page Applications with WebPageTest?”, the problem comes from the fact that the new values that we set with .value (or .innerText) are not kicked back to the Redux store, and thus not “processed” by the application.
What we need to do then it explicitely tell React that the value has changed so that it will update internal bookkeeping accordingly. This can be achieved using Events.
const updateInputValue = (input, newValue) => {
  let lastValue = input.value;
  input.value = newValue;
  let event = new Event("input", { bubbles: true });
  let tracker = input._valueTracker;
  if (tracker) {
    tracker.setValue(lastValue);
  }
  input.dispatchEvent(event);
};
Note: this solution is pretty hacky (even according to its own author), however it works well for our purposes here
Our updated script becomes:
const updateInputValue = (input, newValue) => {
  let lastValue = input.value;
  input.value = newValue;
  let event = new Event("input", { bubbles: true });
  let tracker = input._valueTracker;
  if (tracker) {
    tracker.setValue(lastValue);
  }
  input.dispatchEvent(event);
};

const [usernameInput, passwordInput] = document.getElementsByTagName("input");

updateInputValue(usernameInput, "demo");
updateInputValue(passwordInput, "demo");

document.getElementsByTagName("button")[0].click();
Hurrah! You can try it in your console, it works like a charm.
Translating this to an actual WebPageTest script (with scripting keywords, single line commands and tab-separated parameters) would look like this:
setEventName	Go to Login


navigate	https://marmelab.com/react-admin-demo/

setEventName	Login


exec	const updateInputValue = (input, newValue) => {  let lastValue = input.value;  input.value = newValue;  let event = new Event("input", { bubbles: true });  let tracker = input._valueTracker;  if (tracker) {    tracker.setValue(lastValue);  }  input.dispatchEvent(event);};

exec	const [usernameInput, passwordInput] = document.getElementsByTagName("input")

exec	updateInputValue(usernameInput, "demo")
exec	updateInputValue(passwordInput, "demo")

execAndWait	document.getElementsByTagName("button")[0].click()
Note that as clicking on the submit button leads us to a new page and triggers API calls, we need to use the execAndWait command.
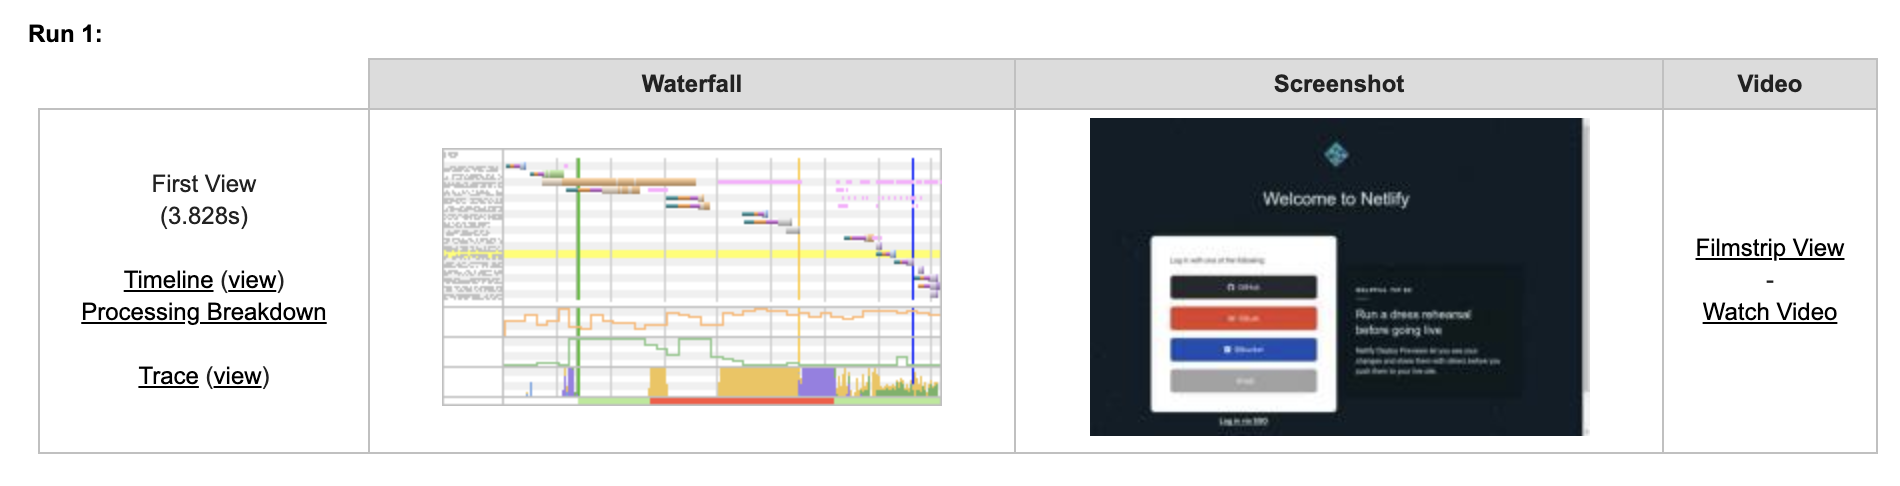
You can see the full results of the test at this address (caution: the results may have been archived by WebPageTest, you can however run the test again yourself!).
Here is a short video (captured by WebPageTest) in which you can see that we indeed passed the authentication step:
Navigating between pages
For traditional Server Rendered pages, to navigate from one to the next in WebPageTest scripting is done via the navigate mywebsite.com/myotherpage command.
Hovever, for Single Page Apps this does not reflect the experience of the user, as client-side routing means that the server has no role in the navigation. Thus, hitting directly an URL would significantly slow down the measured performance (because of the time it takes for the JS framework to be executed), a slowdown that the user does not experience.
It is then crucial when testing performance on Single Page App to simulate the user flow the best we can, meaning that we have to handle the navigation on the client as well.
Hopefully, this is a lot simpler to do than filling up forms: we only need to select the link (or button) that will take us to the new page, and .click() on it!
Let’s follow through our previous example, although now say we want to test the performance of the Reviews list, and of a single Review page.
A user would typically click on the Reviews item on the left-hand navigation menu, and then on any item in the list. Inspecting the elements in the DevTools may lead us to a selection strategy as follows:
document.querySelector("a[href='#reviews'"); // select the Reviews link in the menu
document.querySelector("table tr"); // select the first item in the Reviews list
As both clicks lead to page transition and API calls (to fetch the reviews), we need to use the execAndWait keyword for the script:
setEventName	Go to Login

navigate	https://marmelab.com/react-admin-demo/

setEventName	Login

exec	const updateInputValue = (input, newValue) => {  let lastValue = input.value;  input.value = newValue;  let event = new Event("input", { bubbles: true });  let tracker = input._valueTracker;  if (tracker) {    tracker.setValue(lastValue);  }  input.dispatchEvent(event);};

exec	const [usernameInput, passwordInput] = document.getElementsByTagName("input")

exec	updateInputValue(usernameInput, "demo")
exec	updateInputValue(passwordInput, "demo")

execAndWait	document.getElementsByTagName("button")[0].click()

setEventName	Go to Reviews

execAndWait	document.querySelector("a[href='#/reviews']").click()

setEventName	Open a single Review

execAndWait	document.querySelector("table tbody tr").click()
What about IE 11 compatibility?
WebPageTest allows us to select from which location, browser and network conditions the test will be ran. IE 11 is among available browsers, and if you try the previous scripts on IE11 they will probably fail.
This is due to two reasons:
- We are using ES6 syntax (e.g. arrow function), which is not 100% supported by IE 11
- The CustomEvent API we use for handling forms is not supported by IE11
The ES6 syntax problem can easily be overcome by translating our scripts to ES5 syntax (no arrow functions, no let and const, no array destructuring), which might look like this:
setEventName	Go to Login

navigate	https://marmelab.com/react-admin-demo/

setEventName	Login

exec	var updateInputValue = function(input, newValue) {  var lastValue = input.value;  input.value = newValue;  var event = new Event("input", { bubbles: true });  var tracker = input._valueTracker;  if (tracker) {    tracker.setValue(lastValue);  }  input.dispatchEvent(event);};

exec	var usernameInput = document.getElementsByTagName("input")[0]
exec	var passwordInput = document.getElementsByTagName("input")[1]

exec	updateInputValue(usernameInput, "demo")
exec	updateInputValue(passwordInput, "demo")

execAndWait	document.getElementsByTagName("button")[0].click()

setEventName	Go to Reviews

execAndWait	document.querySelector("a[href='#/reviews']").click()

setEventName	Open a single Review

execAndWait	document.querySelector("table tbody tr").click()
In order to bypass the absence of CustomEvent support, we can turn to Polyfills and add one manually at the top of the script. This Polyfill is available on MDN:
(function() {
  if (typeof window.CustomEvent === "function") return false;
  function CustomEvent(event, params) {
    params = params || { bubbles: false, cancelable: false, detail: undefined };
    var evt = document.createEvent("CustomEvent");
    evt.initCustomEvent(
      event,
      params.bubbles,
      params.cancelable,
      params.detail
    );
    return evt;
  }
  CustomEvent.prototype = window.Event.prototype;
  window.CustomEvent = CustomEvent;
})();
We can then replace all mentions of Event by CustomEvent, set the polyfill to fit on a single line and we are good to go!
setEventName	Go to Login

navigate	https://marmelab.com/react-admin-demo/

exec	(function(){if(typeof window.CustomEvent==="function")return false;function CustomEvent(event,params){params=params||{bubbles:false,cancelable:false,detail:undefined};var evt=document.createEvent("CustomEvent");evt.initCustomEvent(event,params.bubbles,params.cancelable,params.detail);return evt}CustomEvent.prototype=window.Event.prototype;window.CustomEvent=CustomEvent})();

setEventName	Login

exec	var updateInputValue = function(input, newValue) {  var lastValue = input.value;  input.value = newValue;  var event = new CustomEvent("input", { bubbles: true });  var tracker = input._valueTracker;  if (tracker) {    tracker.setValue(lastValue);  }  input.dispatchEvent(event);};

exec	var usernameInput = document.getElementsByTagName("input")[0]
exec	var passwordInput = document.getElementsByTagName("input")[1]

exec	updateInputValue(usernameInput, "demo")
exec	updateInputValue(passwordInput, "demo")

execAndWait	document.getElementsByTagName("button")[0].click()

setEventName	Go to Reviews

execAndWait	document.querySelector("a[href='#/reviews']").click()

setEventName	Open a single Review

execAndWait	document.querySelector("table tbody tr").click()
Et voilà!
General tips and tricks for WebPageTest scripting
To close this article, I wanted to give a few tips and tricks I use to make writing WebPageTest scripts easier. Have a look, and feel free to DM me on Twitter if you have any suggestions!
Security first!
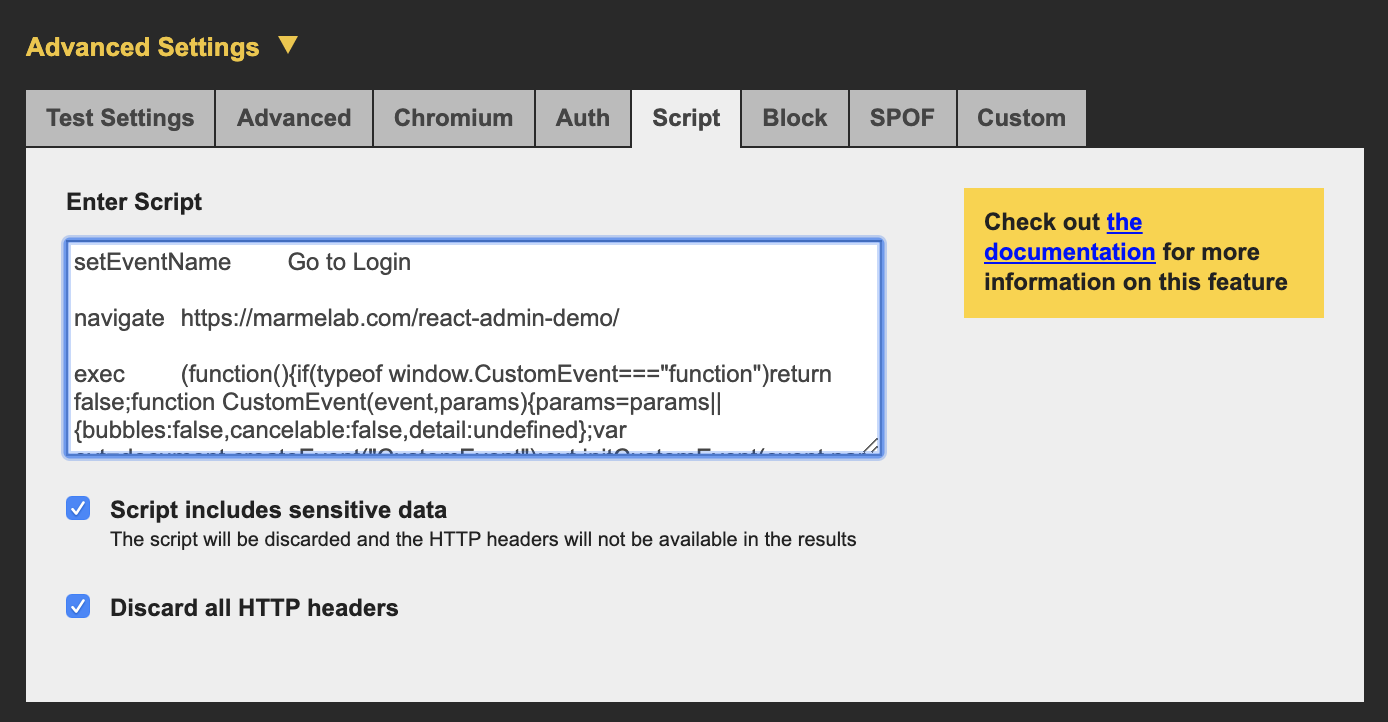
Remember to tick both privacy checkboxes if your script includes sentitive data, like credentials!
Browse the docs
The WebPageTest Scripting docs is full of features that I didn’t cover in this article, ranging from DNS Overriding to iPhone Spoofing and even if/else conditionals!
When you plan on writing a new script, I recommend you have a look at the avaiable parameters first and see if any can help make your scripting easier or more robust.
Long loading states
Sometimes, a remote API Call (say, for fetching the reviews) will take a long time. A loading indicator such as a spinner can be used to tell the user to wait a bit as something is happening.
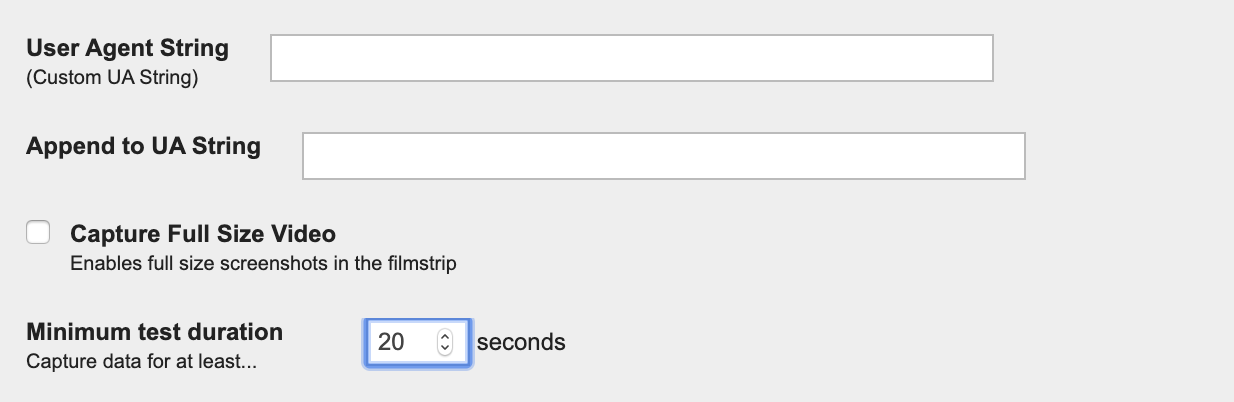
WebPageTest tries to detect when a page has finished loading by figuring out if things are changing on the screen. If your loading indicator lasts a long time, WebPageTest might mistake it for an integral part of your page and cut the audit before the API call ends — thus truncating your measures.
A way to circumvent this issue is to tell WebPageTest to wait at least a certain duration before stopping the test. This is a parameter available under the “Advanced” tab:
Keeping your script (and results) human-readable
- Use blank lines and comments (
//) generously, as single-line JavaScript commands can sometimes be hard to grasp. - Keep a multiline version somewhere as your reference, and single-line everything as you are about to test. This helps readability. Like, a lot.
- Use
setEventNameto name your different “steps”. This makes for more readable tests as it explicits the sequence of pages it goes through, and also appears in the WebPageTest results.
Iterating on your scripts
- First, make sure that your script works in the browser. To do so, strip the WebPageTest keywords (the first word of every line of your script), then copy and paste each line in the browser DevTools console to verify that everything is working as expected at every step of the way.
- Once you are ready to submit your test to WebPageTest, do it first with very light settings: only one run, a fast browser (cough not IE11 cough), no network throttling, no repeat view, a well-dimentioned instance (Dulles, VA usually has good response times)… This will help you detect and correct errors waaay faster.
Tips and tricks from around the internet
- Experimenting With Link Rel=preconnect Using Custom Script Injection in WebPageTest by Andy Davies
- Authenticating with Cookies by Rick Viscomi
If you liked this article, you may want to follow me on Twitter for more content about Web Performance and WebPageTest ✌️